For online students, presentations can be tricky things. If the instructor wants a live presentation, students typically create a slide presentation and present their material through a web conferencing software. However, if the assignment is to record yourself presenting and submit that recording to an online course, that is a bit more difficult. It does not have to be. The following support guide walks you through creating a PowerPoint Presentation video and sharing that video to Canvas.
Topics included in this support document are:
The recording feature of Microsoft PowerPoint is only available for PowerPoint 2013 or newer. If you do not have Microsoft PowerPoint installed on your computer, please see the Student Presentations – PowerPoint w/ Voice Over support guide for instructions on obtaining Microsoft Office. Because you are creating a presentation video, the software also requires your computer to have a microphone. A webcam is optional but may be a useful feature.
Note: This feature is currently only available for PC/Windows users. The features are not available for the Mac version of Microsoft Office.
The first step is to create all visual elements of your presentation. This includes adding any text, images, animations, or transitions to each slide. When creating a presentation, it is best practice not to overload your slides with text and only include images that emphasize what you are presenting.
Enable Recording
 Recording used to be a separate add on called Office Mix. It is not built in to Microsoft PowerPoint, but the feature is not enabled, or turned-on. To turn on Recording:
- Click on File
- Click on Options
- In the window that appears, select Customize Ribbon in the left column. The window will change to display two columns.
- In the right column (Customize the Ribbon), scroll down and check the box next to Recording (see right).
- Click OK.
The Recording tab should appear at the top of row of the PowerPoint window.
Recording Your Presentation
Recording a presentation is similar to recording voice overs audio per slide, except the recorder has the ability to record a webcam and your microphone at the same time.
NOTE: if you have a touch screen computer, you can also markup the PowerPoint slides with a stylus and the recorder will record this as well.
It is still good practice to script what you plan to say per slide in the notes section. These notes are available when you are recording.
When you are ready, go to the first slide of the presentation. Click on the Recording tab and select Record Slide Show from the tool bar (see below).

The screen will change as the recording window opens (see below). The recording controls appear in the top-left corner of the screen (Record, Stop, and Play). The Notes display in the top-center of the screen and a settings menu is in the top-right of the screen.
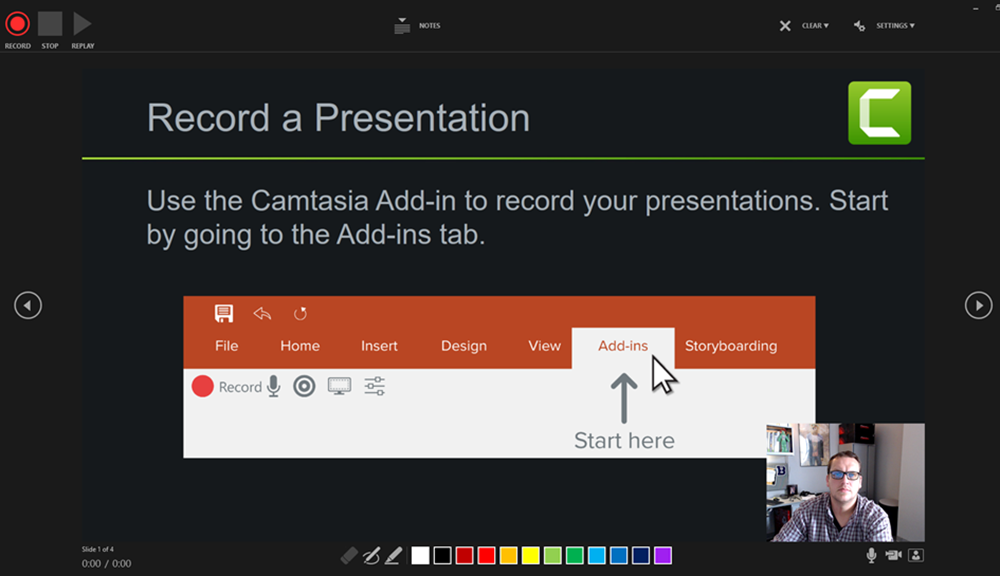
In the bottom-right corner of the screen is a webcam preview and on/off controls for your microphone and webcam. The webcam is not required for recording. You can turn this off and still record your audio on each slide.
NOTE: if you are going to record audio only, the presentation recorder is not required (see PowerPoints w/ Voice Over).
The color blocks at the bottom of the screen are drawing tools you may use if your computer has touch screen capabilities. If you have a PC laptop or Windows Surface Pro that is no more than two years old (or made before 2016), your computer may have touch screen capabilities. The drawing tools allow you to illustrate, or draw, on the presentation slide and those drawings are recorded. For the best use of the drawing tools, you need to use a stylus.
To start recording:
- Click the Record button
- Present your slide
- Click Stop. Click Play to preview the recording. If you need to re-record the, click the Record button again and present your material.
You will repeat these steps for the remainder of your presentation. If you are ready to move onto the next slide, you can use the left/right arrows to move through the presentation as needed. Or, you can close the Recording screen, move to the next slide in your presentation, and start recording again.
Sharing Recordings to Canvas
When you are finished recording on each slide, you need to export your presentation to a video. Video is the preferred method for PowerPoint Recordings for it keep all audio and video timings the same in relation to any drawing or illustrating you may have done on the presentation slide. The export function is located on the Recording tab toolbar (see below).
The video will save (or export) to your computer first. After it has finished exporting, you will need to upload that video to a video streaming service for sharing purposes. You may choose to use a service you are already familiar with, like YouTube or Vimeo, or you can use one of the services provided by USM: Yuja and Stream.
Yuja
Yuja is a video storage and steaming platform subscribed to by USM. It is similar to YouTube. With Yuja, you can record video, upload/store video, and share video files. Unlike YouTube, Yuja is only available to people of USM, and you can only share video with people, or classes, associated with USM.
To upload your exported PowerPoint video to Yuja:
- Go to usm.yuja.com
- Login with your USM username and password (same as your student email account – W######, Password)
- From the main page, click on Upload & Manage
- From the Media Library/My Media page, click Upload
- Click Browse and select the video file from your computer
- When the video has finished processing, click Confirm.
To get the video file from Yuja to Canvas:
- Locate and open the assignment or discussion your instructor wishes the video to be placed.
- Click Reply or Submit Assignment (Reply for Discussions, Submit Assignment for Assignments)If it is an assignment, there is an extra step. In the submission box that appears, click the Text Entry tab. After this extra step, the process for a discussion or an assignment are the same.
- In the text editor that appears, locate an icon called More External Tools. It looks like a blue arrow pointing down.
- In the menu that appears, click on Yuja Media.
- In the window that appears, scroll down to find your uploaded video. If you do not see it, you can use the search text box to search for your video by title.
- Select the video. It will be placed into the text box automatically.
- For a discussion, click Post Reply. For an assignment, click Submit Assignment.
Stream
Stream is a video streaming platform attached to Office365, again, similar to YouTube but only for people within USM. To access Stream, click on the App Launcher icon (located in the top-left corner of the screen – it looks like a box made of nine smaller boxes). If the Stream tile appears on the menu, click it to open stream. Otherwise, click on the All Apps link from the menu and select Stream from the list provided.
At the top of the Stream screen is a navigation row. Click on Create and select Upload a Video from the menu provided to upload your recorded PowerPoint.
NOTE: you will only use Stream if you exported your recorded PowerPoint to a video, which should be saved onto your computer. If you only added voice-over to each slide of the PowerPoint, please see the Student Presentations – PowerPoint w/ Voice Over support guide.
The upload process for Stream is fairly simple. You can drag your video file into the upload box, or click the Select Files link to locate and select the file on your computer. Once the file starts to process (see right), you need to complete the following steps:
- Change the name of your video (if you wish)
- Set the Video Language pull-down to English
- Click on Options
- Turn off Comments
- Click Publish
After the video has finished publishing, click Share. Copy the web link presented. You will paste this link into Canvas.
Once you have the share link, return to your Canvas course and click on Discussions, Assignments, or locate the specific discussion/assignment in Modules.
- Open the assignment or discussion your instructor wishes the video to be placed.
- Click Reply or Submit Assignment (Reply for Discussions, Submit Assignment for Assignments)If it is an assignment, there is an extra step. In the submission box that appears, click the Text Entry tab. After this extra step, the process for a discussion or an assignment are the same.
- Paste the link in the text editor. Please note that a Right Click > Paste may not work in all web browsers. If it does not work, you can paste the link by holding down the CRTL key on our keyboard and pressing V. If you have a Mac, use the Command key instead of CRTL.
- Press Enter/Return after pasting the link. This will help Canvas realize what you pasted was a web link and it will activate it (if you do not press enter/return, the link will only appear as text).
- For a discussion, click Post Reply. For an assignment, click Submit Assignment.