Yuja is a video storage, streaming, and creation platform subscribed to by the University of Southern Mississippi (USM). The software allows users to create or upload audio/video to an online environment, edit media, and stream audio/video content to a Canvas course. In addition, the software automatically captions any/all content created or uploaded. The following is designed to help users “get started” with Yuja.
Topics included within this guide are:
- Logging in to Yuja
- Creating a Course Channel
- Viewing Yuja Video within a Canvas Course
- Adding Video to a Yuja Course Channel
NOTE: for more information on the Video Classroom, see the Yuja – Video Classroom support guide.
See attached resource below:
Download TutorialLogging into Yuja
 Like Canvas, Yuja is a cloud (or internet) based software. Users must have internet access to use the product. The website for USM is usm.yuja.com. All users will come to a USM branded page with a login button in the top-right corner of the screen (see above).
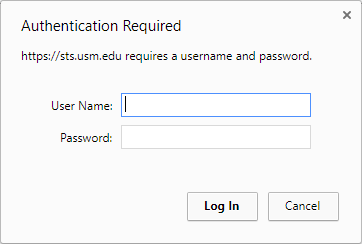 Yuja uses the same login credentials as most other software packages on campus (SOAR, Canvas, Office365). After clicking Login, users will see a username/password box appear as a pop-up (see right). The username is the user’s W-number (w########). The password is the same password used for SOAR.
NOTE: this password box requires the user’s web browser to allow pop-up windows. This may require users adjust their browser security settings. The password box may also throw a security certificate error. Users must add/confirm the exception before they can login to Yuja.
After logging into Yuja, users are taken to a page called the Public Channel. The Public Channel displays any videos USM has made available to the everyone through Yuja. In the top-right corner of the screen is a button of nine small boxes arranged in a square (see right). This is the main menu. By clicking this button, users will see the following options:
![]()
- View Channels – returns you to the Media Channel page
- Create Recording – opens the Capture and Live Stream menu
- Upload & Manage – opens the Media Library for your Yuja account
 The Capture and Live Stream menu is where users will start, or initialize, the video recording process. The Upload & Manage option is where users can access existing videos through their Media Library.
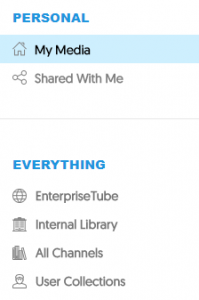
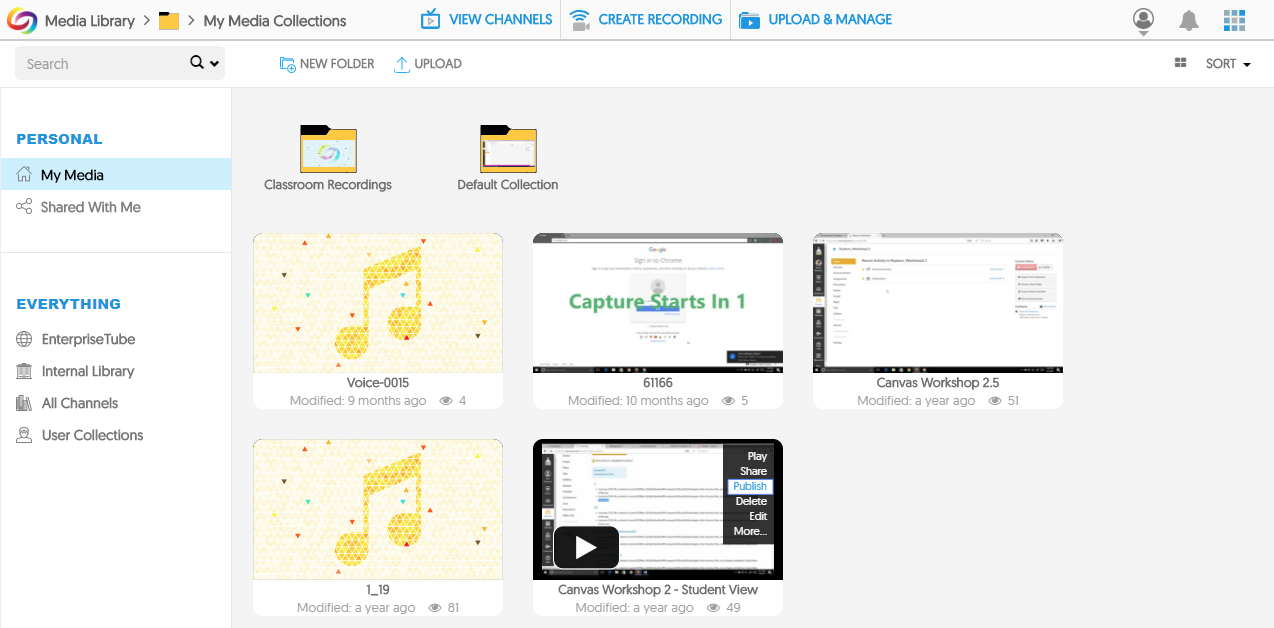
The Media Library also contains a secondary navigation column on the right side of the screen (see right). By default, My Media is the option every user will see upon entering the Media Library. The Shared With Me option displays any/all videos shared with the user by other users.
The remainder of the column displays a series of channels. Instructors will primarily use the All Channels option, as it contains any channel connected to their canvas course, include student enrollments from each course. Students will only see course channels they are enrolled in, and instructors will only see course channels they connect to Yuja through Canvas.
Creating a Course Channel
 Course channels are created when an instructor connects Yuja to a Canvas course. The connection already exists between Yuja and Canvas, but the connection remains inactive until the instructor activates Yuja within a course.
To do this, instructors will enable the Yuja tool in the course navigation menu. The following steps are required:
- Navigate to the desired course in Canvas
- Click on Settings
- Click on the Navigation tab at the top of the settings page
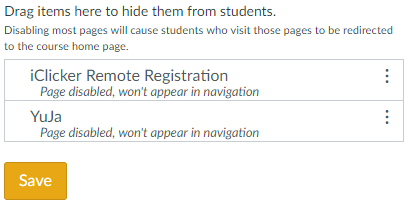
- Scroll down to the section of disabled items (see above)
- Drag the Yuja block to the section above (activated items) or click options menu icon (three vertical dots) within the Yuja item and select Enable
- Click Save
The Yuja item will appear in the course navigation menu. To complete the connection, click on Yuja in the course navigation menu. After you click on Yuja, three things will happen: connection/course channel is created, an enrollment file is sent to Yuja, and the Yuja course channel appears in the content area of your course (see below).
Watching Video Through the Yuja Link
The Yuja connection within a Canvas course allows students to view any/all video content within the course channel, and allows students to navigate to various components of Yuja from within a Canvas course. However, students must also click on the Yuja link in the Canvas course to complete their enrollment into Yuja course channel.
In previous semesters, students have attempted to watch videos within course channels through the Yuja website directly, rather than accessing Yuja through their Canvas course. While students have this ability, they will not have access to a course channel until they click on the Yuja link within that Canvas course.
Videos on the course channel are displayed and organized by recent uploads and most watched. The newest and most watched videos will appear in the larger content section of the screen and the older, or least watched, videos appear below the larger area. The pros and cons of using this tool are:
Pros
- Easy one-click publishing from Yuja to Canvas
- Easily displays all course videos in a single location
- Videos play natively in Canvas
Cons
- No control over video placement or organization
- No control over what students watch when
There is another method for displaying Yuja video in Canvas without using the course channel. You can embed Yuja videos into modules through a content page. Instructions for using this are found in the Yuja – Embedding Video into Canvas support guide.
Adding Video to a Course Channel
If you have existing course video you wish to use in your classes, you can add that video to your Yuja account. Yuja can process most common video types and it will auto-caption any audio/video content uploaded to Yuja. This section focuses on how to add this video content to Yuja and how to move this content into a Canvas course.
You can create lecture video with Yuja, however, process for creating video is quite lengthy. Instructions for creating new video with Yuja are found in the Yuja – Creating New Video Content support guide.
You start by logging into your Yuja account (see Logging into Yuja). The best way to add, or upload, existing video to Yuja is through the Yuja website, not through Canvas. Uploading through Yuja allows you to organize your video into files, or sub-files, thereby creating your own organizational structure of video content.
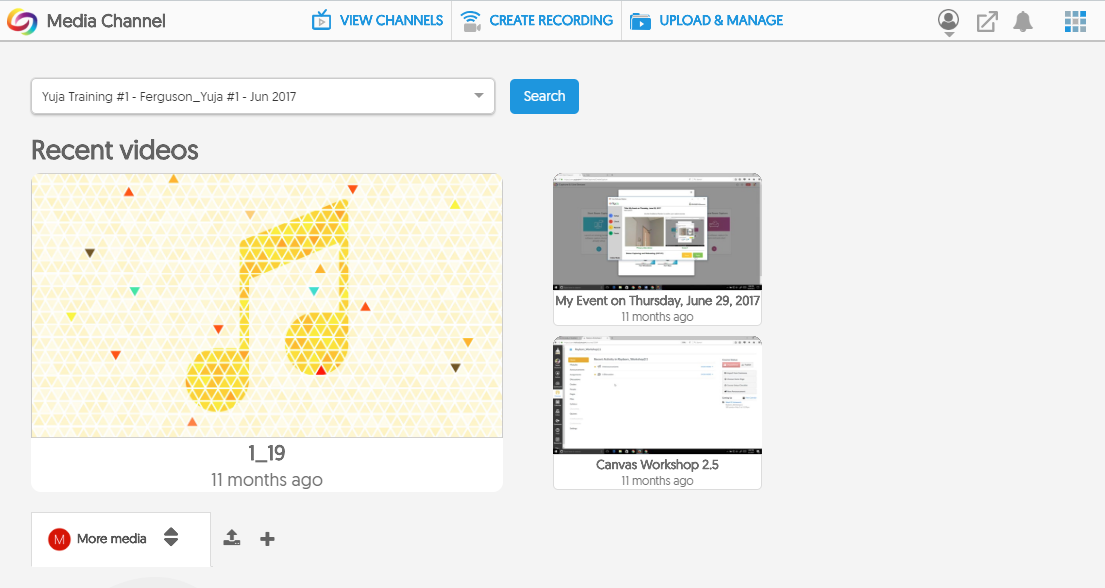
After you login to Yuja, click on Upload & Manage. This opens your Media Library (see below).
You can upload video directly into your Media Library or you can create folders for organizing your video, like what you would do for your Documents or My Documents folder on your computer.
![]() It is recommended you create a folder per class, or course channel, and upload your video for each class into their respective folder. You can create new folders by clicking the New Folder icon/link, located at the top of the Media Library (see right).
It is recommended you create a folder per class, or course channel, and upload your video for each class into their respective folder. You can create new folders by clicking the New Folder icon/link, located at the top of the Media Library (see right).
Once your folders are created, click into the folder and use the Upload icon/link to upload your existing video. The icon/link is located next to the New Folder icon/link.
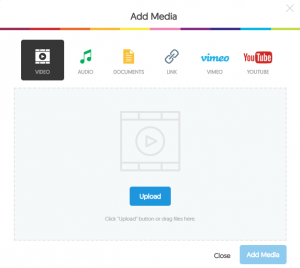 An Add Media window will appear with several options. The video option is selected by default.
Click the Upload button to select the video you with to upload from your computer.
The video will begin to process and you will see a progress bar appear in the upload area of the window.
The upload area allows you to add, or change, the title of the video and provide a description.
At the bottom of the upload area are three icons: Publish, Add Tags, and Add Captions. Add Tags are used for social media descriptor purposes and are not terribly useful for your purposes. If you already have a caption file for the video, you can add it by clicking the Add Captions icon. If you do not have an existing caption file, one will be created for you by Yuja.
The Publish icon allows you to publish the video to a course channel immediately after the video has finished processing. If with to wait to publish the video until after it has finished processing, you can complete the step from within your Media library.
Click the Add Media button to complete the upload process.
NOTE: if you are using a laptop with a small screen, you may have to scroll down to see the Add Media button.
The videos appear as a separate block within your Media library. To send videos to Canvas through your course channel, the videos must be published to that channel. The video will reside in your Media Library and a link is created to allow students to view that video through the course channel in Canvas.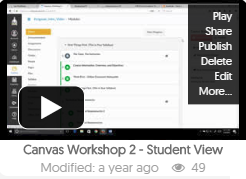
To publish a video, hover your mouse over the video. A menu will appear on the right side of the video block. Select Publish from the menu.
NOTE: if you do not see the desired course channel, return to the Creating a Course Channel section and follow the instructions.